Solo-Farming Mojo
However, the Amani Hex Sticks can now be traded and sold in the AH (providing Blizzard doesn't revert that!), so stocking up on sticks and doing a run in a 5-man is actually a fairly effective way to try for the little blue frog.
I'd like to take a little space here and thanks everyone for their support & suggestions, as well all the fan mail I got over the past year. I'd also like to thank Breanni & the rest of the staff of WarcraftPets for hosting my guide, and for creating such an awesome community here.
Good luck, and good hunting!
To any vanity pet collector, there are those few pets that are difficult to get. Be it the Hyacith Macaw, any of the Whelplings, or a Disgusting Oozeling, we all know the pain of trying to farm something with insanely low drop rates or other challenging obstacles. Mojo, the loveable blue frog found in the level 70 dungeon of Zul'Aman, is definitely on that list. He's in that small group of pets that are readily available, but few have.
This guide will help any lv80 character (or higher) obtain Mojo on his or her own. It was written with lv80 characters in mind, so if you've graduated to a higher level, some of the advice below may no longer apply. Use your best judgment.
Contents

Mojo-Farming Necessities
1. Overview
To start off with, while I am writing this from the perspective of a hardcore pet collector, there's nothing to stop anyone else from using this guide, whether they are casual collectors or just want a Mojo of their very own.
I'm going to break this down to be as detailed as possible, but as I don't play every single class, there may be spots where I'll be able to give you a general idea, but you will have to improvise based on what your particular class/race combo can do.
2. Abilities
First, you will need to be able to either reset aggro (Feign Death, Vanish, etc.) or crowd control (a.k.a. CC, such as Freezing Trap, Polymorph, Hex, Sap, stuns, etc.). I cannot stress this enough, you will NEED at least one of these abilities to make this method work for you. If you don't have one, consider getting a friend to help you.
It's also possible to do this with neither aggro resets or CC abilities, but you're going to need to be able to take a beating.
3. Gear
Obviously, this is going to vary the most for people. I'd prefer not to offer any recommendations on gear, since the player base and even levels of people farming are going to vary. So whatever gear I might recommend at lv80 will obviously be obsolete at higher levels, and not work at all for sub-80's. Therefore, this guide is going to be more about the farming mechanics rather than listing gear.
The best advice I can offer is that since the bulk of the damage you will incur is physical, resist sets will be useless.
4. Consumables
Have a large amount of consumables handy, as you're going to want to increase your survivability and damage output as much as possible, as well as making sure you can stay for the long haul:
I'd recommend flasks, as they persist through death. While most people will probably never die if they do this correctly, there is always the odd chance that a mob takes off running or (like what happened to me twice) the instance pulls shenanigans and you aggro the boss(es) from a mile away.
Empty your bags as much as possible. You are going to get drops, and those drops will likely be covering the costs of consumables, and possibly repair bills.
Into the Breach
5. Getting Inside
First off, getting in. You will need to be in a raid to do this, so I suggest having a friend log onto a rarely used alt and making a raid with him. That way your friend can log back over to whichever toon he likes, and the alt will stay in the raid, allowing you access to ZA.
Talk to Harrison Jones. He has a few choice words of warning for you, too:
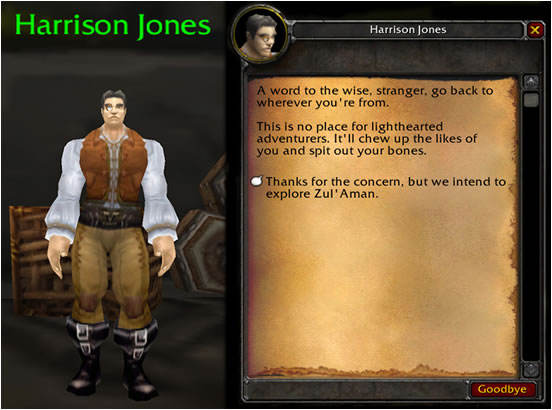
After telling Harrison Jones that you still intend to explore Zul'Aman, despite his dire warnings, he'll run over to the gong:

Since patch 3.2, it only requires one person hitting the gong to open ZA, so you no longer have to scrounge 4 other willing bodies to get in. So go ahead and help him out—give it a whack.
6. Welcoming Party
As you enter, two Amani'shi Guardians will spawn (#1 on the map below), along with a gang of weaker Amani'shi Savages (#2 below).
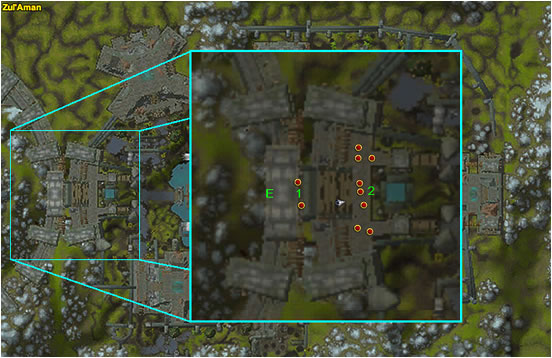
The Guardians have about 60,000 HP each, and are immune to CC, detect stealth and invisibility. And if that's not bad enough, they hit like trucks, doing 4.8-5k per hit on cloth, critting up to 11k.
Dealing with these two is no joke, and having the Savages running around makes it worse, as they do 350-500 per hit, as well as a Hamstring that reduces your movement speed, making running away from this group nearly impossible.
The best way I have found to deal with these is to reset aggro, or run out of the instance. Once you do, they will reset back to guarding the door, and the Savages will run back down to their initial starting point.
At this point, if you're lv80+, you can just run in between them and they won't aggro. The Savages at the bottom of the ramp should be cleared once past the guardians, but they're easy without their two big bad backups.
The Guardians won't respawn, so if you can't run past without grabbing aggro, you can burn one of the Guardians down quickly, reset the other, and repeat. The savages will come running every time, so if it's hard for you to deal with them, trying pulling the Guardians back into the main entry area, away from where they initially start.
(Yet another) Alternate Method: As soon as you start the opening sequence, you're locked to the raid instance. If you can't kill the Guardians, or run past them, another way of doing it is to log out and wait out the sacrifice timer. Sometimes, and ONLY sometimes, this will cause the Guardians and Savages to despawn, leaving the entry way clear for you to run in.
7. Introducing Yourself to the Natives
After getting past the Guardians and Savages, you'll run to the central dais:
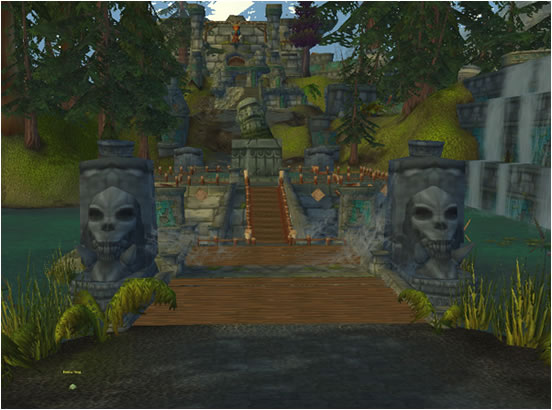
This is an island in a small pond at the very bottom of the ramp. You'll have to go by one of the patrols to get there, so be careful and give them plenty of room.
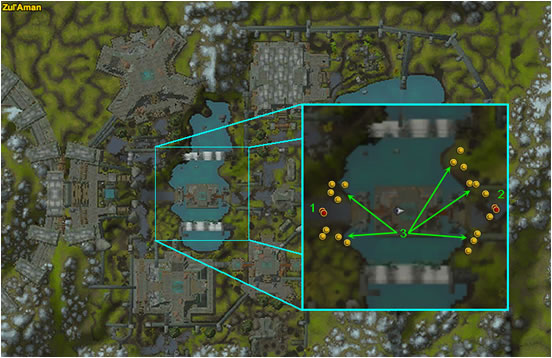
The patrol on the West side (#1 on the map above) is always an Amani'shi Medicine Man and an Amani'shi Wind Walker, while the East side (#2 above) is always patrolled by an Amani'shi Beast Tamer and an Amani'shi Flame Caster. These mobs are shown below.
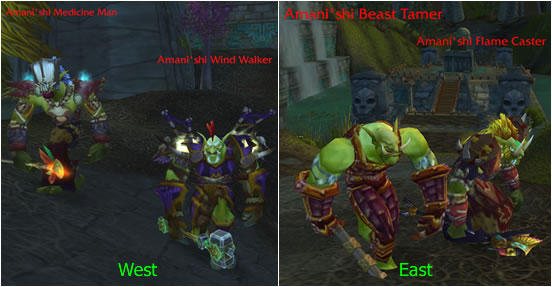
The "kill" mobs have patrol paths that follow a rough triangle, but they don't adhere to any specific route, most likely due to the rough terrain around these areas. The clusters of yellow dots (#3 above) are where the Forest Frogs are located. These are the little guys you're going to be shooting with Amani Hex Sticks.
It depends on what class and spec you are as to which pair is best suited to farming for you; some experimentation will likely be required, but I can tell you that the Medicine Man/Wind Walker pair are prone to bugging on the reset, so you may want to just kill the pair of them and move on to the other side.
Farming For Mojo
8. How to Say "Hello!" in Amani'shi
The actual farming of the mobs is relatively simple, but care should be taken, since it is very possible to do something that causes the re-spawn to bug.
- Pick a mob, and kill it. (Incidentally, this is the summation of saying "Hello!" in Amani'shi. At least, that's how they tried to greet me.)
- Amani'shi Beast Tamer & Amani'shi Flame Caster: The Flame Caster dies faster, but the Beast Tamer hits harder. It's a "pick your poison" fight, but for the sake of speed, I always picked the caster.
- Amani'shi Medicine Man & Amani'shi Wind Walker: These guys don't hit as hard as the other pair, but they are: A) Prone to bugging and not respawning the killed mob, B) The Medicine man drops totems that make him immune to damage, and C) BOTH mobs self-heal. (Due to the respawn bugging out, I frequently only got 2-3 kills on them before I had to swap off to the other pair.)
- Once you've killed one mob, reset aggro. The other mob should run back to where you pulled them from, and the killed mob will respawn, running up to his partner. (Hunters: Freeze Trap the second mob, dismiss your pet, and Feign Death. It's an annoying process, but it beats waiting for your tanking pet to die and then rezzing him everytime.)
- Wait for the patrol to move off to a safe distance, and loot the corpse. You must loot before killing another mob, or there is a high chance that it will bug and not respawn after the next kill.
- Rinse and repeat.
It gets tricky for classes lacking an aggro reset, though. You will have to run out of the instance. In this case, follow these directions
- Same as #1 for classes with aggro reset.
- You must loot the body and use any Amani Hex Sticks right away, since they despawn on exiting. This entails looting, using the Hex Stick, and then running out of the instance, all while CCing the remaining mob or standing there taking the hits.
A way of making it so you can "run and gun" a frog on the fly is to use the following macro:
/cleartarget
/target Forest Frog
/use Amani Hex Stick
Also, if you've got more than one stick, be careful about spamming this. I don't know that you can, as I've never tried, but you don't want to accidentally target and de-hex the same frog twice.
- Get out. Seriously, run out of the instance. You need to drop combat to get the patrols to reset, and in any instance or raid, there is no "soft reset" by running away. Invest in some good running boots and lay down some shoe leather.
Don't worry about looting, either. The NPCs you save will drop little chests or money bags that will remain for a few minutes, and Mojo will jump right into your bags, so there's no risk of missing him if you de-hex frogs while running for your life. - Rinse and repeat.
9. Working My Mojo

While the method for doing this can be difficult (read: mind-numbingly boring) for some classes, it is about the only way to solo-farm effectively, at least until you've leveled beyond the point where these mobs are a threat.
Amani Hex Sticks have an average drop rate of about 37.74%, and the chance of getting a Mojo is about 2%. By combining the Mojo drop rate with the stick drop rate, on average you will need to farm about 133 mobs.
If you can manage one kill per minute, you're still going to spend a couple hours in ZA, and that's being very optimistic. I was taking an average of 1:30 to kill each mob, including resetting aggro and looting, etc. etc., so get a drink and get comfortable, as you will likely be doing this for a while.
I got about 20 sticks an hour using this method, and spent a total of about 3 hours farming them before I finally got Mojo.
Keep in mind that you get other drops, and some of the rescued NPCS leave behind chests with items in them, or bags of gold containing 15-20g. Vendor NPCs generally have rare things for sale that contain other goodies. After about an hour, I'm usually up 75-100g, even taking consumable costs into account.
Some other players on my server have reported as little as 10 sticks farmed before they received their Mojo. I also know of one poor soul who has passed her 300th stick, and continues farming because, as she puts it, "If I stop now, it's like that damn frog wins, and all the hours I spent farming are for nothing." Hopefully you'll fare better.
Good luck hunting down your Mojo!![]()
~Keristrazja (Bladefist US), Draenei Hunter, Minipet Enthusiast


